This page is applicable to NetConnect X 2.5.177 and above
Overview
NetConnect provides the ability to integrate directly with EntraID in order to validate user credentials against your Azure environment, providing seamless integration with your exiting cloud environment.
Prerequisites
In order to create an EntraID authentication stage, you’ll need Global Administrator access to an Azure environment configured with EntraID. This is required to create and configure the various webapps needed to handle the authentication requests on the Azure side. Additionally, your NetConnect instance must have an SSL certificate.
Configure a WebApp on your Azure Active Directory.
Navigate to Microsoft EntraID > Enterprise Applications
Select ‘New Application’. Enter a name for your Application
Choose “Accounts in this directory Only”
Under Redirect URI select ‘Single-page Application’ and enter your Redirect URL which is in the format:
https://FQDN
Configure additional authentication
Select Authentication under your new App registration and under “implicit grant and hybrid flows”, tick both Access and ID tokens.
Select “Add a platform”, chose “Mobile and Desktop Applications” and enter the FQDN of the NetConnect server in the “Custom redirect URIs”
Generate a Client Secret
Select “Certificates & secrets” and under Client secrets click “new Client secret”
Give it a description and set an Expiry Date (This will need to be recreated after each expiry so set it as long as your company policy allows)
Copy the value as this is the only time you’ll be able to see the whole value.
Permissions required for NCX
The following permissions must be in place on your Enterprise Application in order to fully integrate with Netconnect. Depending on your Entra ID Policies, you may need to provide Admin consent for these permissions after applying them to the application.
- Microsoft Graph – Application Permissions:
- Group.Read.All
- User.Read.All
- Microsoft Graph – Delegated Permission:
- Group.Read.All
- User.Read
- User.Read.All
Creating an Azure Active Directory/EntraID Authentication Stage
Once your Enterprise Application has been correctly configured, you’ll be able to create your authentication stage. Navigate to the Authentication -> Authentication Stages page, click on the ‘Create’ button, select ‘Azure AD’ and click ‘Next’.
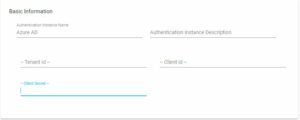
You will be presented with the Basic Information page. Completing these fields will allow you to create a connection to your Azure AD environment. Additional Information can be used to identify your stage easier.
Complete the following details to configure your Azure AD stage.
| Auth Stage Settings | Description |
| TenantID | Enter your Azure Tenant ID |
| Client ID | Enter the Application (Client) ID from the App registration |
| Client Secret | Enter value of the secret you saved earlier |
| Advanced Options – Workstation Address attribute | If using MyDesktop, enter the AzureAD Attribute field used to store the Hostname of the PC (We recommend “faxNumber”) |
Accessing your NetConnect instance with an active Azure AD stage
When accessing an instance of NetConnect configured for Azure AD Authentication, users are presented with a standard Microsoft login page. Once a user enters their standard credentials, they will be passed through to their workspace from where they can access their applications.
Resetting Passwords
Environments configured with Azure AD allow users to set or update expired passwords. When a password has expired or an account has been configured with a one-time password, users will be prompted to reset their passwords via the standard Windows password reset mechanism.
Master Admin access when an AzureAD stage is active
Accessing your NetConnect account with Master Admin credentials is not possible via the standard Microsoft portal that presents when you have an Azure AD stage configured. In order to login as a Master Admin, you will need to navigate to add the suffix “/#/masteradminlogin” to your NetConnect URL. For example, if your URL is “netconnect.mydomain.com”, you’ll need to navigate to “netconnect.mydomain.com/#/masteradminlogin”
Next Steps…
Now your Azure AD Authentication Stage has been configured, you can assign licences to your users or configure and assign applications. Alternatively, you may wish to create an additional authentication stage in order to configure multi-factor authentication.
<<Configure a Active Directory Auth. Stages Configure an LDAPS Auth. Stage >>