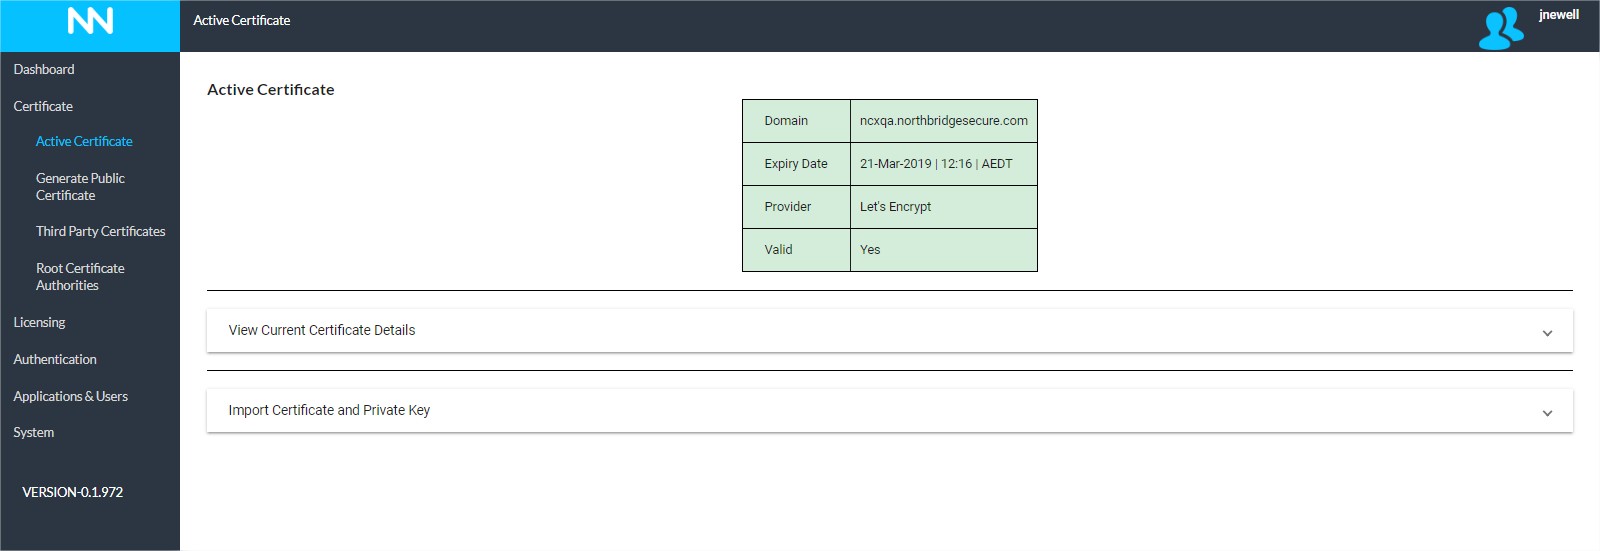
This page is applicable to NetConnect X 1.5 and above

This section is intended to act as a guide to installing NetConnect X (NCX) within a virtual environment. In it, we’ll cover the key steps involved with installing a fresh instance of the latest NetConnect X release and publishing a desktop. Installation will be via a prepared image available from the Northbridge Partner Portal.
Note this guide is intended for NetConnect X 1.0.0 or above.
Before you begin…
Prior to commencing your installation, you will require the following:
- A capacity to install a virtual instance that meets the following minimum specs:
- 4GB of RAM
- 2 CPU
- 40GB of hard disk space
- Internet access.
- A copy of the latest NetConnect X .ova or .vhd file.
- Available from https://www.northbridgesecure.com/software
- A NetConnect trial licence key, available from customersupport@northbridgesecure.com
- 1 x static internal/private IP address.
- 1 x static external/public IP address with port 443 available, required in order to allow connections to NetConnect from outside of your network
- A nominated sub-domain. This will be the URL that users will access your NetConnect instance from, for example ‘netconnect.mydomain.com’
- An A-record within your public DNS which resolves your Public IP address to the URL you wish to use for accessing you NetConnect X instance.
- IP address or hostname of a network joined Windows Professional desktop to connect to.
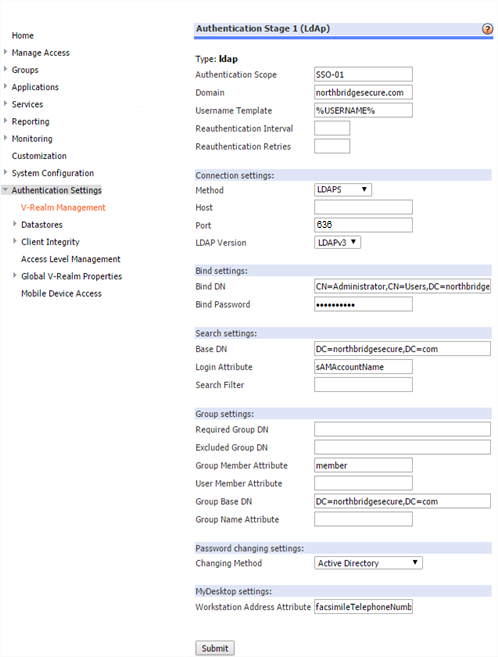
Network Changes
Once your NetConnect instance has been installed, configured and licenced there will be several steps you will need to take within your environment to ensure external access is available for all users. Specific steps will vary between environments and requirements, but in broad terms you will need to:
- NAT IP Addresses. Map the assigned Public IP address to your assigned internal IP address via Network Address Translation (NAT) within your router/firewall. This action will ensure traffic coming into your network on the nominated Private IP address is routed to your NetConnect instance.
- Open Firewall Ports. If accessing NetConnect from behind a firewall, port 80 (HTTP) and port 443 (SSL) must be open to allow traffic in both directions.
Next Steps…
Providing you’ve addressed all the above items, you’ll be ready to begin your installation.